I've written a lot about CSV processing. Here are some examples {tag}csv.
It crops up in my books. A lot.
In all cases, though, I make the implicit assumption that my readers already know a lot of Python. This is a disservice to anyone who's getting started.
Getting Started
You'll need Python 3.6. Nothing else will do if you're starting out.
Go to https://www.continuum.io/downloads and get Python 3.6. You can get the small "miniconda" version to start with. It has some of what you'll need to hack around with CSV files. The full Anaconda version contains a mountain of cool stuff, but it's a big download.
Once you have Python installed, what next? To be sure things are running do this:
- Find a command line prompt (terminal window, cmd.exe, whatever it's called on your OS.)
- Enter python3.6 (or just python in Windows.)
- If Anaconda installed everything properly, you'll have an interaction that looks like this:
MacBookPro-SLott:Python2v3 slott$ python3.5
Python 3.5.1 (v3.5.1:37a07cee5969, Dec  5 2015, 21:12:44)
[GCC 4.2.1 (Apple Inc. build 5666) (dot 3)] on darwin
Type "help", "copyright", "credits" or "license" for more information.
>>>
More-or-less. (Yes, the example shows 3.5.1 even though I said you should get 3.6. As soon as the Lynda.com course drops, I'll upgrade. The differences between 3.5 and 3.6 are almost invisible.)
Here's your first interaction.
>>> 355/113
3.1415929203539825
Yep. Python did math. Stuff is happening.
Here's some more.
>>> exit
Use exit() or Ctrl-D (i.e. EOF) to exit
>>> exit()
Okay. That was fun. But it's not data wrangling. When do we get to the good stuff?
To Script or Not To Script
We have two paths when it comes to scripting. You can write script files and run them. This is pretty normal application development stuff. It works well.
Or.
You can use a Jupyter Notebook. This isn't exactly a script. But. You can use it like a script. It's a good place to start building some code that's useful. You can rerun some (or all) of the notebook to make it script-like.
If you downloaded Anaconda, you have Jupyter. Done. Skip over the next part on installing Jupyter.
Installing Jupyter
If you did not download the full Anaconda -- perhaps because you used the miniconda -- you'll need to add Jupyter. You can use the command conda install jupyter for this.
Another choice is to use the PIP program to install jupyter. The net effect is the same. It starts like this
MacBookPro-SLott:Python2v3 slott$ pip3 install jupyter
Collecting jupyter
  Downloading jupyter-1.0.0-py2.py3-none-any.whl

Collecting ipykernel (from jupyter)
  Downloading ipykernel-4.5.2-py2.py3-none-any.whl (98kB)
    100% \|████████████████████████████████\| 102kB 1.3MB/s
It ends like this.
Downloading pyparsing-2.1.10-py2.py3-none-any.whl (56kB)
    100% \|████████████████████████████████\| 61kB 2.1MB/s

Installing collected packages: ipython-genutils, decorator,
traitlets, appnope, appdirs, pyparsing, packaging, setuptools,
ptyprocess, pexpect, simplegeneric, wcwidth, prompt-toolkit,
pickleshare, ipython, jupyter-core, pyzmq, jupyter-client,
tornado, ipykernel, qtconsole, terminado, nbformat, entrypoints,
mistune, pandocfilters, testpath, bleach, nbconvert, notebook,
widgetsnbextension, ipywidgets, jupyter-console, jupyter

  Found existing installation: setuptools 18.2
    Uninstalling setuptools-18.2:
      Successfully uninstalled setuptools-18.2
  Running setup.py install for simplegeneric ... done
  Running setup.py install for tornado ... done
  Running setup.py install for terminado ... done
  Running setup.py install for pandocfilters ... done
Successfully installed appdirs-1.4.0 appnope-0.1.0 bleach-1.5.0
decorator-4.0.11 entrypoints-0.2.2 ipykernel-4.5.2 ipython-5.2.2
ipython-genutils-0.1.0 ipywidgets-5.2.2 jupyter-1.0.0
jupyter-client-4.4.0 jupyter-console-5.1.0 jupyter-core-4.2.1
mistune-0.7.3 nbconvert-5.1.1 nbformat-4.2.0 notebook-4.4.1
packaging-16.8 pandocfilters-1.4.1 pexpect-4.2.1 pickleshare-0.7.4
prompt-toolkit-1.0.13 ptyprocess-0.5.1 pyparsing-2.1.10
pyzmq-16.0.2 qtconsole-4.2.1 setuptools-34.1.1 simplegeneric-0.8.1
terminado-0.6 testpath-0.3 tornado-4.4.2 traitlets-4.3.1
wcwidth-0.1.7 widgetsnbextension-1.2.6
Now you have Jupyter.
What just happened? You installed a large number of Python packages. All of those packages were required to run Jupyter. You can see jupyter-1.0.0 hidden in the list of packages that were installed.
Starting Jupyter
The Jupyter tool does a number of things. We're going to use the notebook feature to save some code that we can rerun. We can also save notes and do other things in the notebook. When you start the notebook, two things will happen.
- The terminal window will start displaying the Jupyter console log.
- A browser will pop open showing the local Jupyter notebook home page.
Here's what the console log looks like:
MacBookPro-SLott:Python2v3 slott$ jupyter notebook
[I 08:51:56.746 NotebookApp] Writing notebook server cookie secret to
/Users/slott/Library/Jupyter/runtime/notebook_cookie_secret
[I 08:51:56.778 NotebookApp] Serving notebooks from local
directory: /Users/slott/Documents/Writing/Python/Python2v3
[I 08:51:56.778 NotebookApp] 0 active kernels
[I 08:51:56.778 NotebookApp] The Jupyter Notebook is running at:
http://localhost:8888/?token=2eb40fbb96d7788dd05a49600b1fca4e07cd9c8fe931f9af
[I 08:51:56.778 NotebookApp] Use Control-C to stop this server
and shut down all kernels (twice to skip confirmation).
You can glance at it to see that things are still working. The "Use Control-C to stop this server" is a reminder of how to stop things when you're done.
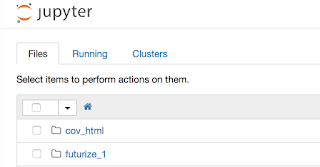
Your Jupyter home page will have this logo in the corner. Things are working.

You can pick files from this list and edit them. And -- important for what we're going to do -- you can create new notebooks.
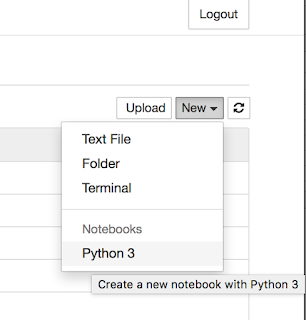
On the right side of the web page, you'll see this:

You can create files and folders. That's cool. You can create an interactive terminal session. That's also cool. More important, though, is that you can create a new Python 3 notebook. That's were we'll wrangle with CSV files.
"But Wait," you say. "What directory is it using for this?" The jupyter server is using the current working directory when you started it.
If you don't like this choice, you have two alternatives.
- Stop Jupyter. Change directory to your preferred place to keep files. Restart Jupyter.
- Stop Jupyter. Include the --notebook-dir=your_working_directory option.
The second choice looks like this:
MacBookPro-SLott:Python2v3 slott$ jupyter notebook --notebook-dir=~/Documents/Writing/Python
[I 11:15:42.964 NotebookApp] Serving notebooks from local directory: /Users/slott/Documents/Writing/Python
Now you know where your files are going to be. You can make sure that your .CSV files are here. You will have your ".ipynb" files here also. Lots of goodness in the right place.
Using Jupyter
Here's what a notebook looks like. Here's a screen shot.

First. The notebook was originally called "untitled" which seemed less than ideal. So I clicked on the name and changed it to "csv_wrestling".
Second. There was a box labeled In [ ]:. I entered some Python code to the right of this label. Then I clicked the run cell icon. (It's similar to this emoji -- ⏯ -- but not exactly.)
The In [ ]: changed to In [1]:. A second box appeared labeled Out [1]:. This annotates our dialog with Python: each input and Python's response is tracked. It's pretty nice. We can change our input and rerun the cell. We can add new cells with different things to run. We can run all of the cells. Lots of things are possible based on this idea of a cell with our command. When we run a cell, Python processes the command and we see the output.
For many expressions, a value is displayed. For some expressions, however, nothing is displayed. For complete statements, nothing is displayed. This means we'll often have to throw the name of a variable in to see the value of that variable.

The rest of the notebook is published separately. It's awkward to work in Blogger when describing a Jupyter notebook. It's much easier to simply post the notebook in GitHub.
The notebook is published here: slott56/introduction-python-csv. You can follow the notebook to build your own copy which reads and writes CSV files.