Schema-Based Access Validation
We validate that both applications and files share a schema. This can be done through a three-tier process:
Validate application’s use of a schema via conventional unit testing. This is the Unit Test The Builder Function section.
Validate file conformance to a schema via “live-file testing”. This is the Live File Test The Builder Function section. This is a kind of accceptance test to confirm the application can work with a data file.
Validate the three-way application-schema-file binding by including a Data Validation mode in every file processing application. This is in a separate Data Validation Mode demo application.
This demo application will focus on the schema and workbook processing.
This lets us confirm that the application will handle inputs correctly.
See the demo/test_demo.py file in the Git repository for the complete source.
Of course, the rest of the application also requires good unit testing. We’ll assume the remainder of the application is also tested properly. Failure to test is simply failure.
The first two levels of testing validate the application-to-schema binding. The third level of testing validates the file-to-schema binding.
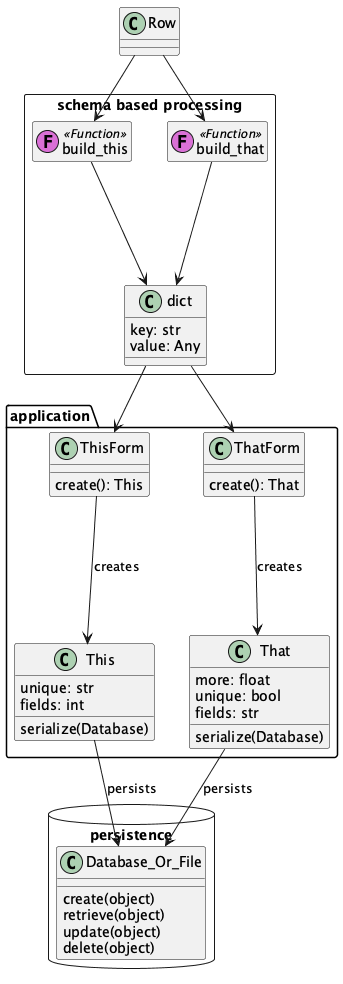
The Application, Capture, and Persistence Layers
We need to distinguish between three sepaarate but closely-related concepts.
The foundational objects for our application. It can help to separate the validation rules and object builders from the application objects themselves. The objects may have complex interactions. The validation can also be complex, but is utterly distinct from other behavior.
Peristence for the application objects. This may include object-relational mapping or other serialization techniques.
Capture of the source data for the application objects. This is schema-dependent processing. Experience shows that there is wide variability here when working with spreadsheets. It helps to disentangle this from the essential application processing and persistence.
The intent here is to follow the SOLID design principles and minimize the interfaces as data moves from the source document structure to an common intermediate dictonary format.
This common dictionary structure can then be validated and used to create the application objects that define only the unique behavior of the application, without the clutter of source decoding or valdiation.
The use of a ThisForm to validate the This instances follows the Django design pattern.
This isn’t the only approach.
We can bundle the validation into the class definition, and follow the Pydantic design pattern.
In this document, we’ll focus on the builder functions and some higher-level processing. There are two tiers of testing, and we’ll show how to structure the functions and the testing to provide confidence that an application will support a wide variety of source file formats.
Unit Test the Builder Function
See Using Stingray Reader for background. We’re going to need a “builder function.” This transforms the source row object into the target object or collection.
Here’s the essential function we want to test in isolation.
import pytest
from typing import Any
from stingray import (
    open_workbook,
    HeadingRowSchemaLoader,
    Workbook,
    Sheet,
    Row,
    WBUnpacker,
    SchemaMaker,
)

def some_builder(aRow: Row) -> dict[str, Any]:
    return dict(
        key=aRow['Column "3" - string'].value(), value=aRow["Col 2.0 - float"].value()
    )
To test this, we need a mock of a stingray.Row object.
from unittest.mock import Mock, call, sentinel

@pytest.fixture
def mock_row():
    attr_2 = Mock(value=Mock(return_value=3.1415926))
    attr_3 = Mock(value=Mock(return_value="string"))
    row = {"Col 2.0 - float": attr_2, 'Column "3" - string': attr_3}
    return row
This mock object uses a simple dictionary as a mock
for a Row object. For the simplest
cases, this is a valid assumption.
The test is effectively this:
SCENARIO: Build an intermediate object from a source document
GIVEN a row instance
WHEN fields are extracted
THEN an intermediate object is built
Here’s the test case.
def test_builder(mock_row):
    document = some_builder(mock_row)
    assert document == {"key": "string", "value": 3.1415926}
This is the essential unit test for a builder.
This works because a Stingray Row is designed to behave like a dictionary.
We can, of course, create more elaborate mock Row instances including attributes that need to be ignored.
We can also test rows that are missing attributes.
For more complex cases, it can become awkward
to mock all the features of a Row.
For this, an integration-style test can be
easier to write.
Integration Test the Builder Function
When more features of the Row object are
used by a builder, then an integration test
can be easier to build. There are several ways to tackle this.
One approach is create an actual Row using a mocked Sheet
object. This works out well for examining more complex issues with navigation
and data conversion.
A Row instance uses Nav objects as helpers to navigate the data structure.
There are distinct Nav subclasses for non-delimited data, delimited data,
and workbooks.
The Row object requires a Sheet instance. The Sheet instance
requires a schema. Here’s how we can build up the required fixture from pieces.
First, the schema.
@pytest.fixture
def mock_schema():
    json_schema = {
        "title": "Unit test workbook",
        "type": "object",
        "properties": {
            "Col 1 - int": {"type": "integer"},
            "Col 2.0 - float": {"type": "number"},
            'Column "3" - string': {"type": "string"},
            "Column '4' - date": {"type": "number", "conversion": "excel_date"},
            "Column 5 - boolean": {"type": "boolean"},
            "Column 6 - empty": {"type": "null"},
            "Column 7 - Error": {"type": "string"},
        },
    }
    Draft202012Validator.check_schema(json_schema)
    schema = SchemaMaker().from_json(json_schema)
    return schema
This is used by the mocked Sheet instance.
@pytest.fixture
def mock_sheet(mock_schema):
    workbook = Mock(unpacker=WBUnpacker())
    sheet = Mock(
        workbook=Mock(return_value=workbook),
        schema=mock_schema,
    )
    return sheet
The Sheet instance becomes part of the mock Row instance.
@pytest.fixture
def row_instance(mock_sheet):
    row = Row(mock_sheet, [42.0, 3.1415926, "string", 20708.0, True, None, "#DIV/0!"])
    return row
This mocked Sheet instance is then used in the test case.
def test_builder_1(row_instance):
    document = some_builder(row_instance)
    assert document == {"key": "string", "value": 3.1415926}
This kind of integration test assures us that the more complex navigation features are being tested properly.
Live File Test the Builder Function
Step two is to test the some_builder() function with all rows in a given workbook.
In this demo, we’re using sample/excel97_workbook.xls.
Generally, we want to compute some aggregate (like a checksum) of various data items to be sure we’ve read and converted them properly.
Here’s a fixture based on a file:
@pytest.fixture
def sample_workbook_sheet():
    workbook_path = Path(os.environ.get("SAMPLES", "sample")) / "excel97_workbook.xls"
    wb = open_workbook(workbook_path)
    sheet = wb.sheet("Sheet1").set_schema_loader(HeadingRowSchemaLoader())
    # This is essential for keeping the workbook open.
    # Once the `wb` variable goes out of scope, the workbook is closed.
    yield wb, sheet
The fixture creates both a workbook and a sheet. Some tests will use the workbook, others will use the sheet. It’s handy to have a single fixture create both for us.
Here’s the test case to assure all rows get built from the sheet. In this case, the example data has two rows.
def test_should_build_all_rows(sample_workbook_sheet):
    wb, sheet = sample_workbook_sheet
    summary = Counter()
    for row in sheet.rows():
        result = some_builder(row)
        summary[result["key"]] += 1
    assert summary["string"] == 1
    assert summary["data"] == 1
This tells us that our builder function works properly with the sample file.
The application consists of additional functions.
We can test them both as isolated units and as an integration with the some_builder() function.
Unit Test the Sheet Function
See Using Stingray Reader for background.
We’re going to need a “sheet process function.”
This transforms the source sheet into the target collection.
It applies the row builder function, named some_builder() and whatever
processing goes with that to all of the rows of a sheet.
def process_some_sheet(sheet: Sheet):
    counts = Counter()
    for row in sheet.rows():
        row_dict = some_builder(row)
        counts["key", row_dict["key"]] += 1
        counts["read"] += 1
    return counts
For complete isolation, we can provide a mock sheet to supply mock rows to a mock builder. Yes, that’s a lot of mocking.
@pytest.fixture
def mock_sheet_2():
    return Mock(rows=Mock(return_value=[sentinel.ROW]))


@pytest.fixture
def mock_builder():
    mock_builder = Mock(return_value={"key": sentinel.KEY})
    return mock_builder
We can then assure ourselves that the overall sheet processing takes rows from the sheet and provides them to the builder.
def test_process_some_sheet(mock_sheet_2, mock_builder, monkeypatch):
    monkeypatch.setitem(globals(), "some_builder", mock_builder)
    counts = process_some_sheet(mock_sheet_2)
    assert some_builder.mock_calls == [call(sentinel.ROW)]
    assert counts == Counter({("key", sentinel.KEY): 1, "read": 1})
Live File Test The Sheet Function
An integration test can check the overall row counts from processing a live file. This confirms that the sheet-level processing works as expected.
In this demo, we’re using sample/excel97_workbook.xls.
The test opens the workbook.
It selects a sheet from the workbook using the class that extracts the schema from the row headers.
The test then uses the process_some_sheet() function on the given sheet to extract data.
In this case, the extraction is a frequency table.
def test_should_build_sample_row(sample_workbook_sheet):
    wb, sheet = sample_workbook_sheet
    counts = process_some_sheet(sheet)
    assert counts["read"] == 2
    assert counts["key", "string"] == 1
    assert counts["key", "data"] == 1

    column_names = list(sheet.schema.properties.keys())
    assert column_names == [
        "Col 1 - int",
        "Col 2.0 - float",
        'Column "3" - string',
        "Column '4' - date",
        "Column 5 - boolean",
        "Column 6 - empty",
        "Column 7 - Error",
    ]
This shows how the sheet processing is tested with a live file to be sure it will step through all of the rows.
The counter provides some assurance that all of the processing was correct.
Once we have the foundations of our application tested in isolation and with live files, we can move on to creating an application that includes more processing steps and more validation rules.